This series of articles is now located at www.thechurchpod.com. Switch your bookmarks accordingly and thanks for reading!
Do you know how that mic signal from stage gets into the console? And how that gets to the main mix? It’s a good idea to know signal flow and how to set proper levels along the way. So, here we go…
Signal flow
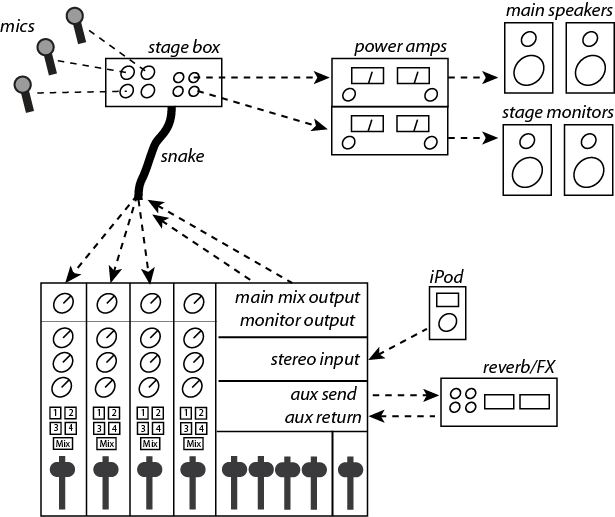
The big picture, that you’re well aware of, is that mics are plugged into a box of some sort on stage and goes through a conduit to the console, where each signal gets connected to an individual channel. These are all sent to the mix fader, which sends this result back through the conduit backstage to the main amplifiers and speakers.
Let’s finesse that. Looking at your console, the goal is to not see just a bunch of buttons and switches, trying to memorize which one the team leader told you to push. You want to filter out the noise, all the stuff that doesn’t apply. All you want are the controls that get that mic signal through the channel and over to the main mix fader. So, a mic is connected to the input of a channel. That goes down the channel signal path (passing through the EQ, compressor, aux sends, etc) and stops until something routes it onward. This is the assignment matrix, and on a live console it may be as simple as a single LR or Mix button (could also be automatically set in the board, or assigned via setup screen on a digital console). The signal is then routed to the main mix, where it gets combined with everything else and routed back through the snake to the amps and speakers backstage. Here are the operational steps:
Mic preamplifier
Channel fader
Assignment matrix (mix assign switch)
Mix fader
Signal levels
A microphone signal output is extremely low, requiring a significant amount of amplification before it can be used by a console and other gear. This is accomplished by the microphone preamplifier, which is found on every console channel. It’s the first thing a signal runs into, so you crank up the signal to line level, where it can now be passed along to the next stage. (Some churches are running digital consoles connected to a stage head unit; the preamps are located there, and so the signals are amplified in this unit before being converted to digital for transmission to the console.)
The preamp is the first crucial level to be set; too low and you have to turn the channel fader up a lot more, and any digital feeds to a Dante or Aviom-type monitor system won’t have enough signal gain. Too high and it’ll distort. While the musician is playing, gradually turn up the preamp until the meter shows optimal (green, no yellow or red). My TF5 has a nifty graphic display that shows when you’re in the good range.
The next two gain stages on the console are the channel fader and main mix fader, which of course controls everything combined together. The goal is to balance signal level going through each of these stages so you’re not over-compensating anywhere. Once you get the preamp level set, don’t mess with it. Set the main mix fader to 0 and leave it alone. Use the channel faders to mix.
Be aware of how each of these gain stages affect signals along the way. For example, if you turn down the channel fader, does it affect the stage monitors? No, assuming you set your aux sends pre-fader, which is typical for stage monitor mixes. The aux send is grabbing a copy of the channel signal before the channel fader.
What happens if you turn down the main mix fader? Well, the overall volume in the room will decrease. The relative balance between parts stays the same. Monitors on stage stay the same. Nothing else changes.
Now, if you turn down the mic preamplifier, does that affect anything? Yup—everything! The preamp is the first thing the signal goes through in the channel, so changing this will affect everything, including any monitor mixes, settings on EQ and compressors, aux sends for reverb, even digital feeds to a Dante network. Set the preamp and leave it alone.
Take time to learn not only how your console routes signals, including reverb and effects, but how the overall system is laid out in the room. How exactly does that floor pocket XLR connector get to a particular channel on the console? What are my options if a certain channel doesn’t seem to be working; can I reroute the mic to a different jack and get it to the same channel? How are the stage monitors being fed? You don’t have to know all the small details, just enough to visualize where everything goes and how it gets there. You’ll be able to operate better, trouble-shoot as needed, and do a better job overall.
Want to help your team learn more about running sound for your services? Mixing for God is designed specifically for volunteers to help understand procedures, terminology, and how to build a quality mix.


